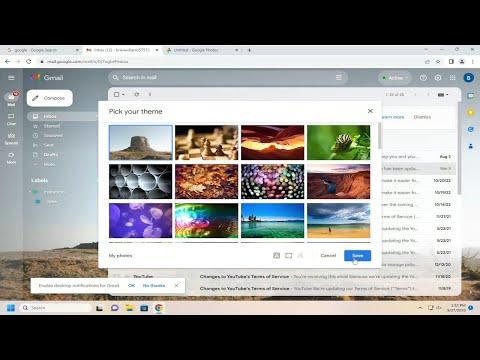
I was getting pretty tired of seeing the default Gmail background every time I opened my email. It felt so impersonal and unoriginal. I wanted something that felt more like me, something that would make me smile each time I checked my inbox. After a bit of searching and experimenting, I figured out how to customize my Gmail background with a picture of my own. Here’s how I managed to do it, step-by-step.
First, I had to choose the right picture. I wanted something that would look great on the screen but wasn’t too distracting. I decided to use a photo from a recent trip I took to the mountains. The colors were vibrant, and it captured the essence of a serene landscape. The key here is to pick an image that’s high-quality and fits well with the dimensions required by Gmail.
Next, I needed to make sure the image was appropriately sized. Gmail recommends a minimum width of 1440 pixels for the background image, and the height should be at least 900 pixels. I used an image editor to adjust the dimensions of my photo. It’s important to maintain the aspect ratio to avoid any distortion. I resized the image while keeping an eye on the quality so that it would look crisp and clear when applied.
Once I had my image ready, I logged into my Gmail account. I went to the upper right corner of the screen and clicked on the gear icon to open the settings menu. From there, I selected “See all settings” to dive into the more detailed options. In the settings menu, I clicked on the “Themes” tab. This is where the magic happens.
In the “Themes” section, I was greeted with a variety of pre-set background images, but I was focused on adding my own. I clicked on the “Customize” button, which opened up additional customization options. There was a “My Photos” tab where I could upload my own image. I clicked on this tab, which prompted me to upload a picture from my computer.
After uploading, Gmail allowed me to adjust the cropping of the image. I dragged the corners of the cropping box to focus on the part of the image that I wanted to display. I made sure the important elements of the photo were well-positioned and not covered by email elements. It was crucial to get this right so that my beautiful mountain landscape was fully visible and not obscured by the email interface.
Once I was happy with the crop, I clicked on “Save” to apply the changes. It was exciting to see my own photo as the background of my Gmail account. The process was straightforward, and seeing my personalized touch on such a frequently used platform was really satisfying.
For those who want to get a bit more advanced, there are a few additional tips I discovered. For instance, if you have multiple images you’d like to rotate through, Gmail doesn’t natively support a slideshow feature for backgrounds. However, I found a workaround using browser extensions that can change the background periodically. This was a fun way to keep things fresh without having to manually update the image.
In addition, if you’re working with a photo that has a lot of detail or is highly textured, you might want to test how it looks across different devices. What looks good on a computer screen might appear differently on a mobile device. I checked my Gmail on my phone to ensure that the background didn’t distract too much from the email content and adjusted accordingly if needed.
The whole process took me about 15 minutes from start to finish. It was a small change, but it made a big difference in how I felt when I used Gmail. Now, instead of a generic background, I have a beautiful, personalized image that brightens my day every time I check my email.
Customizing the background on Gmail is a great way to make your email experience more enjoyable and uniquely yours. Whether you choose a serene landscape, a memorable photo, or an inspiring quote as your background, it adds a personal touch to your daily routine. If you haven’t tried it yet, I highly recommend giving it a shot. It’s a simple tweak that can make a surprisingly big difference in your overall digital environment.
