It all started on a particularly hectic Monday. I was juggling multiple tasks, preparing reports, and optimizing my workflow. My computer was supposed to be my trusty ally, but it was becoming increasingly unreliable. Random crashes and sluggish performance were throwing my productivity off course. Frustration was mounting, and I needed to get to the bottom of these issues.
That’s when I stumbled upon the concept of reliability history. I had heard about it vaguely in the past but never really paid much attention. Reliability history, it turned out, is a feature in Windows 10 and Windows 11 that records the stability of your system, including crashes, warnings, and other critical events. It’s essentially a timeline of your computer’s reliability and could be the key to diagnosing my issues.
I decided to dive into this feature and see if it could shed some light on what was going wrong with my machine. The first step was to access the Reliability Monitor, which, as I discovered, is a built-in tool designed to provide a graphical representation of the system’s reliability history.
To begin, I clicked on the Start menu and typed “Control Panel” into the search bar. I noticed that many of us often overlook the Control Panel in favor of the newer Settings app, but it remains a treasure trove of useful tools. After launching the Control Panel, I switched the view to “Large icons” to make navigation easier.
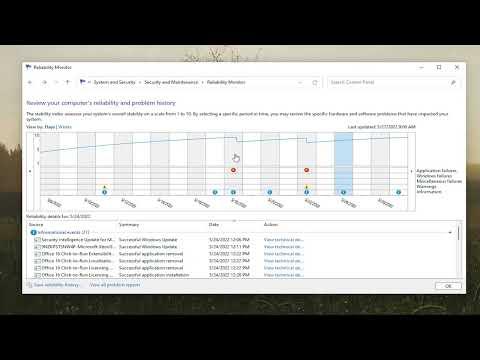
I then found and clicked on the “Security and Maintenance” option. This section provides a summary of the system’s security status, maintenance activities, and reliability. Within Security and Maintenance, there’s a section dedicated to “Reliability Monitor.” I clicked on “Reliability Monitor” and was greeted by a detailed graph illustrating my computer’s stability over time.
The Reliability Monitor displays a timeline with events and warnings. Each point on the timeline represents a day, and the graph shows the overall reliability index for that day. A higher score indicates better system reliability, while a lower score indicates potential problems. My initial glance at the graph revealed several dips and red icons, indicating issues and critical events.
To dig deeper, I clicked on the critical events listed on the timeline. These events included application crashes, system failures, and other issues that had occurred. For each event, there was a detailed description and sometimes a link to additional information or troubleshooting steps. This was immensely helpful in pinpointing specific problems. I noticed a pattern where certain applications were consistently causing issues.
Next, I decided to investigate these specific applications. I navigated to the “View technical details” link for one of the critical events and was presented with a more detailed error report. This report included error codes, which were useful for searching online for solutions or understanding the nature of the issue.
One of the recurring problems was with a specific application that I relied heavily on for my work. It had been crashing frequently, and its errors were clearly recorded in the Reliability Monitor. I searched for solutions online using the error codes provided and discovered that an update was available for the application. I promptly downloaded and installed the update, hoping it would resolve the issues.
As I continued to review the Reliability Monitor, I also noticed a few hardware-related issues. The tool had flagged problems related to the hard drive and memory. This prompted me to run built-in Windows diagnostics. I accessed the Windows Memory Diagnostic tool by typing “Windows Memory Diagnostic” into the Start menu search bar and following the on-screen instructions. I also checked the health of my hard drive using the “chkdsk” command in Command Prompt.
With the diagnostics completed and the application updated, I returned to the Reliability Monitor to observe any improvements. The timeline started to show fewer critical events, and the reliability index began to rise. It was encouraging to see that my efforts were having a positive impact. I continued to monitor the Reliability Monitor regularly to ensure that no new issues cropped up.
In addition to resolving the immediate problems, I learned a valuable lesson about the importance of maintaining system reliability. The Reliability Monitor had provided me with insights into both software and hardware issues, and addressing them had significantly improved my computer’s performance.
Now, whenever I encounter performance issues or system instability, my first step is to consult the Reliability Monitor. It has become an essential tool in my troubleshooting toolkit, helping me to identify and resolve problems efficiently.
In summary, the Reliability Monitor in Windows 10 and Windows 11 is a powerful feature that can help diagnose and resolve system issues. By regularly reviewing the reliability history, I’ve been able to keep my computer running smoothly and avoid many common pitfalls. It’s a reminder that even the most reliable systems can benefit from a little maintenance and attention.