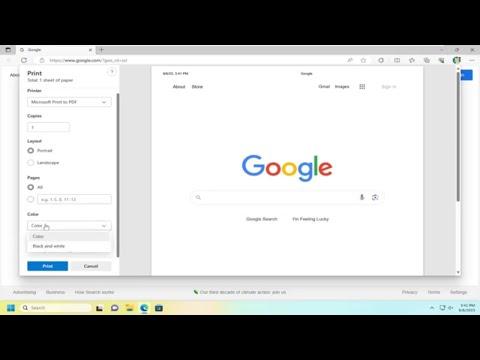
To print a webpage in Microsoft Edge, I first needed to make sure that the webpage was fully loaded and ready for printing. Here’s a detailed guide on how I accomplished this.
I opened Microsoft Edge and navigated to the webpage I wanted to print. Before diving into the print options, I took a moment to ensure that the content I wanted to print was displayed correctly on the screen. This meant checking for any elements that might not be needed, such as advertisements or unnecessary images, as these can affect the final printed result.
Once I was satisfied with how the webpage looked, I moved on to printing it. I accessed the print dialog by clicking on the three horizontal dots in the top-right corner of the browser window to open the menu. From there, I selected the “Print” option. Alternatively, I could have used the keyboard shortcut Ctrl + P to open the print dialog directly.
In the print dialog that appeared, I saw various settings that I could adjust. The first thing I did was choose the printer I wanted to use from the drop-down list. If I didn’t have a physical printer connected, I could select “Save as PDF” to create a digital copy of the webpage instead.
Next, I adjusted the print settings to fit my needs. The “Pages” section allowed me to choose whether I wanted to print all pages or a specific range. If the webpage was long and only certain parts were relevant, I entered the page numbers for just those sections. This feature was useful for ensuring that I only printed the necessary information.
I then looked at the “Layout” options. I could choose between portrait and landscape orientations, depending on the format of the content on the webpage. For webpages with more horizontal content, I opted for landscape orientation to better fit the content on the page.
The “More settings” section provided additional customization options. Here, I could adjust the margins, which I found helpful to make sure the content didn’t get cut off at the edges. I also had the option to include or exclude background graphics. If I wanted a cleaner printout without distracting images or colors, I unselected the “Background graphics” checkbox.
Before finalizing the print job, I previewed the print layout. The preview allowed me to see how the content would appear on paper and make any necessary adjustments. If something didn’t look quite right, I went back to tweak the settings until I was happy with the result.
After reviewing everything, I clicked on the “Print” button to start the printing process. If I had selected “Save as PDF,” I was prompted to choose a location on my computer to save the file and name it accordingly. If I was printing to a physical printer, the print job was sent to the selected printer, and I could pick up the printed pages once they were ready.
Overall, the process was straightforward, but taking the time to adjust settings and preview the layout made a big difference in the quality of the printed result. This approach ensured that the final printout was exactly what I needed, whether it was for a physical document or a digital record.
