I was sitting at my desk one evening, enjoying a rare moment of peace when my tranquility was abruptly shattered. I had been working on a crucial project that required a stable internet connection, but my internet service provider had been experiencing intermittent issues. With deadlines looming and the pressure mounting, I decided it was time to tackle this problem head-on. I needed to find a way to manage my data usage more effectively, so I could ensure that my limited data plan wouldn’t be drained before the end of the billing cycle. That’s when I stumbled upon the concept of setting a metered connection in Windows 11.
The idea was simple but crucial: by setting my connection as metered, I could restrict Windows from using excessive data in the background, which might otherwise lead to additional charges or an exhausting data limit. I had heard about this feature before, but I wasn’t entirely sure how to activate it. Determined to solve the issue, I embarked on a journey to turn on the metered connection on my Windows 11 laptop.
First, I opened the settings menu. I navigated to the bottom-left corner of my screen and clicked on the Start menu, then selected “Settings.” This was the gateway to adjusting the various parameters of my system. Once in the Settings window, I went to the “Network & internet” section. This section is essentially the hub for all things related to internet connectivity on my computer.
In the “Network & internet” section, I was presented with several options. Since I was connected to Wi-Fi, I clicked on “Wi-Fi” to manage my wireless network settings. A new window appeared with details about my current Wi-Fi network. Here, I selected the network I was currently connected to. This led me to a screen that displayed all the specifics about my connection, including the name of the network and its status.
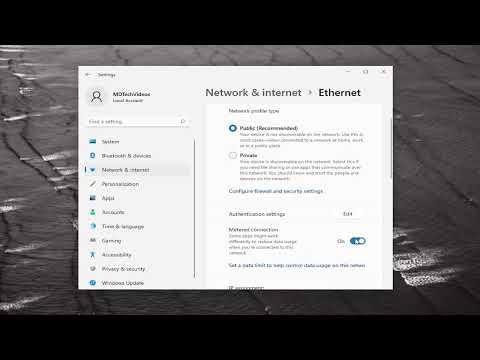
My next step was to find the option that would allow me to set the network as metered. I scrolled down a bit until I found a toggle switch labeled “Metered connection.” This was precisely what I needed. By flipping this switch to the “On” position, I would signal Windows 11 to treat my network as metered.
I was a bit anxious, hoping this action would indeed limit background data usage. With a quick click, I enabled the metered connection setting. To my relief, the switch changed color, indicating that the metered connection was now active. I took a moment to review the other settings on this page, just to make sure everything looked correct.
To confirm that the metered connection was functioning properly, I decided to check if Windows 11 was respecting my new data restrictions. I went back to the main Settings menu and clicked on “Data usage” under the “Network & internet” section. This section provides a detailed overview of how much data has been used over a specified period. By observing this, I could ensure that Windows 11 was adhering to the metered connection rules and not consuming more data than necessary.
I also took the time to explore the “Advanced options” under the “Data usage” settings. Here, I could view which apps were using the most data. This was quite useful because it allowed me to identify any applications that might be consuming an excessive amount of data. If I noticed any apps behaving unusually, I could take further action to limit their data usage or even uninstall them if necessary.
Another crucial step in managing my data usage was to review and adjust the update settings. Windows 11 often downloads updates automatically, which can consume a significant amount of data. I went to the “Update & Security” section in the Settings menu and selected “Windows Update.” From there, I clicked on “Advanced options” and found the option to manage how updates are delivered. I made sure that updates were set to download only when connected to a metered connection, reducing the risk of unexpected data consumption.
Finally, I wanted to ensure that my metered connection settings would persist across reboots and network changes. To do this, I double-checked that the metered connection setting remained active even after restarting my laptop. This was important because I wanted to make sure that my data usage was consistently managed, regardless of how frequently I restarted my computer or switched between different networks.
In conclusion, setting a metered connection on Windows 11 turned out to be a straightforward yet effective solution for managing my data usage. By following these steps, I was able to ensure that my limited data plan was used wisely, helping me avoid additional charges and maintain a stable internet connection for my important projects. The process of enabling the metered connection involved navigating through various settings, checking data usage, and managing updates. This experience not only resolved my immediate problem but also gave me a better understanding of how to control data consumption on my Windows 11 laptop.
